
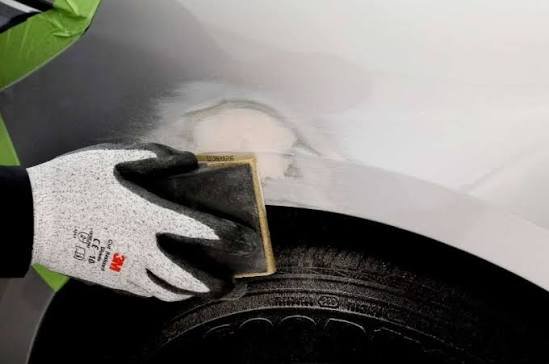
How to Apply Bondo 1100 Body Filler for Professional-Level Auto Repair Results
Body filler is the cornerstone of professional automotive repair, transforming damaged panels into smooth, paint-ready surfaces. Whether you’re tackling a small dent or prepping an entire fender, the quality of your repair depends on proper application technique.
At Bondo, we’ve been helping DIYers and professionals achieve factory-quality results for decades. Our 1100 body filler is engineered for easy mixing, strong adhesion, and smooth sanding — but even the best product needs correct application. This guide walks you through every step, from surface prep to final sanding, so your repair looks invisible under paint.
Preparing the Repair Area for Body Filler
Surface preparation determines whether your filler bonds permanently or fails in weeks. Start by grinding or sanding the damaged area down to bare metal, removing all paint, primer, and rust. Use 36- to 80-grit sandpaper or a grinding disc to create a clean, slightly rough surface.
Feather the edges where good paint meets bare metal — blend outward in concentric circles so the transition is gradual, not a hard step. This prevents visible edges after painting. Wipe the area with wax and grease remover or denatured alcohol to eliminate any oils or contaminants that prevent adhesion.
Never apply filler over paint, rust, or grease. These layers act as release agents, causing the repair to crack or pop off under stress or temperature change.
Mixing Bondo 1100 Body Filler to the Right Consistency
Proper mixing is critical — too much hardener causes the filler to set before you can spread it, while too little leaves it tacky for hours. Squeeze a golf-ball to tennis-ball sized amount of Bondo 1100 onto a clean mixing board. Add a hardener ribbon equal to about 2-3% of the filler volume — roughly a 1-inch strip per golf-ball of filler.
Fold and knead the two components together with a spreader, scraping the board clean as you work. Mix until the color is uniform with no streaks — usually 30-60 seconds. The filler should be smooth and spreadable, like peanut butter, not runny or stiff.
Work in small batches. Mixed filler remains workable for only 3-5 minutes in warm conditions, so mix only what you can apply in one pass. In hot weather, work even faster or move to a shaded area to extend your working time.
Applying and Shaping the Filler
Spreading Technique
Use a clean spreader to apply the mixed Bondo 1100 in firm, overlapping strokes. Press down hard enough to force the filler into the metal’s surface texture, ensuring mechanical adhesion. Build slightly proud of the surrounding panel — you’ll sand it flush later.
Work quickly and deliberately. Apply the first coat in one direction, then cross-stroke at a right angle to fill voids and eliminate air pockets. Avoid excessive back-and-forth, which traps air bubbles that create pinholes when sanded.
Layering for Deep Repairs
For dents deeper than 1/4 inch, apply filler in multiple thin layers rather than one thick glob. Let each layer cure fully (15-30 minutes) before adding the next. Thick single applications trap solvents, causing shrinkage and cracking months later.
Scratch each cured layer with 36-grit before adding the next coat — this gives the new layer something to grip. The final coat should overfill the repair by about 1/8 inch to allow for sanding.

Sanding Body Filler to a Smooth, Paintable Surface
Let the Bondo 1100 cure until it’s firm but still slightly warm to the touch — about 15-20 minutes depending on temperature and hardener ratio. Start shaping with 36- or 40-grit sandpaper on a long sanding block to knock down high spots and level the surface.
Use long, straight strokes across the repair, not circular motions that create waves. Check your progress by running your hand over the area — you should feel no ridges or dips. A straightedge held against the panel reveals low spots that need another skim coat.
Progress through finer grits: 80-grit to refine the shape, then 120-grit to smooth the texture. For final prep before priming, finish with 180- or 220-grit. The surface should feel uniform with no scratches deeper than the primer can fill. Wipe clean with a tack cloth before moving to the paint booth.
Achieving Professional Body Filler Results
Mastering body filler application comes down to three fundamentals: meticulous surface prep, accurate mixing, and patient sanding. Rush any step, and you’ll see the flaw under paint — sometimes immediately, sometimes months later when the repair cracks or shrinks.
Our Bondo 1100 formula is designed to make each stage easier, with consistent mixing, strong metal adhesion, and smooth sanding characteristics. Follow the techniques in this guide, and your repairs will be invisible under finish paint, holding up for years under daily driving stress. Take your time, work cleanly, and trust the process.
Notes
Bondo 1100 becomes sandable in 15-30 minutes under normal conditions, but full cure takes 1-2 hours. Temperature and hardener ratio affect timing — warmer temps accelerate curing, while cold slows it. You can start rough-sanding when the filler is firm but slightly warm; wait for full cure before priming or applying stress to the repair.
No. Body filler must be applied to bare, clean metal for proper adhesion. Paint acts as a barrier that prevents the filler from bonding, leading to cracking or delamination. Always sand or grind down to bare metal, feather the edges, and clean thoroughly before applying any filler.
Apply no more than 1/4 inch of body filler per coat. Thicker applications trap solvents, causing shrinkage, cracking, or incomplete cure. For deeper repairs, build up in multiple thin layers, letting each cure fully and sanding between coats. This produces a stronger, more stable repair.
Cracking usually results from applying filler too thick, using too much hardener, or applying over a contaminated surface. Thick layers shrink as they cure, creating stress cracks. Excess hardener causes rapid, uneven curing. Oil, grease, or rust under the filler prevents adhesion, allowing movement that cracks the repair.
To fix it, grind out the cracked filler, prep the metal properly, and reapply in thinner coats with correct hardener ratio.
While not absolutely immediate, you should prime within a few hours to a day. Body filler is porous and absorbs moisture, which can cause rust to form on the metal beneath or lead to paint adhesion problems. Primer seals the filler and metal, preventing these issues and providing a uniform base for paint.
Avoid using heat guns or lamps to cure body filler faster. Forced heat causes uneven curing — the surface hardens while the interior remains soft, leading to shrinkage, cracking, and weak adhesion. Let Bondo 1100 cure naturally at ambient temperature for the strongest, most durable repair.